If you're looking for my basic soup post, you'll find it here:
Bead Soup Reveal.
It's odd that even though I've been trying to stay home as much as possible through
this storm, I really haven't made an attempt to do anything in the craft room. Maybe because it's too dark outside (I like lots of natural light), maybe because I've been working on finishing the Bead soup blog party list (I'm finally done!), maybe because I'm just not feeling inspired, or maybe because Pat and I have been having in-depth discussions about the food we want to put in our bodies. Whatever it is, I've been camped in front of the television and computer instead of in front of my bead table for days. I have a feeling that's going to change soon.
First though, while I've stared at these screens for days I've been thinking about jewelry. . .particularly about my Bead Soup pieces. Since I didn't go into much detail in my Soup Reveal (for your benefit of course. I wanted you to be able to get on with the hopping), I would like to get into those details now. WARNING- this is picture and word heavy!! As well, many of the shots were taken with my camera phone and are not the best I could have done. Proceed with that in mind.
I'll do this in the order of the BSBP post because I believe that's the order in which I made everything anyway.
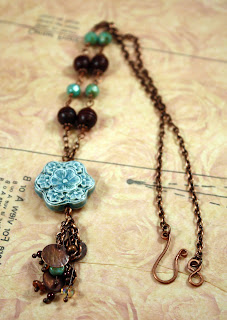
When I opened my bead soup I was awe-struck by the beauty of the blue raku focal. I almost immediately laid out a design with the rosewood beads and the turquoise Czech glass. I let that idea simmer for a while. . .like WEEKS before I finally just broke down and made it.
Simply enough, it's the rosewood beads with antiqued copper daisy spacers on either side and the turquoise glass beads both wire wrapped onto darkened copper wire. These are attached to each other and then to the antiqued copper chain. As you can see, I chose not to use the toggle clasp that Karen sent me and instead made my own with some heavy gauge copper wire. I thought that the toggle was too . . .bulky for the delicacy of the necklace.
I really like the above design still. Yet, it just didn't have enough
pizazz for the awesomeness of that focal. So, I pondered the design again. By just re-orienting the hole vertically instead of horizontally, I knew that I would have some room to add dangles. I also wasn't completely keen on the long-ish length of this first attempt, so I removed some of the chain to be included in the dangles.
It was easy enough to split the removed chain into three different lengths and hang them from a jump ring attached to the simple loop that was now at the bottom of the pendant. I picked out a variety of pieces for the dangles. The first were some thin copper circles that I altered with a texture hammer. I also tried to color them with paint, but my attempts were unsuccessful. (I
really need to get some of that Vintaj Patina soon!) Instead, they simply remained textured. They look fine, whatever. Each of those were hung with jump rings onto a different section of the chain. I gathered a couple of Swarovski crystals and copper spacers that I had won in a giveaway ages ago, round copper beads, small matching turquoise discs, and some chocolate-colored glass pearls. Each of these were put on a ball head pin and with some jiggle room left before a simple loop was formed at the top. They were all attached to the chain by the simple loops.
As you saw in the reveal, this is what I ended up with.
~~~~~~~~~~~~~~~~~~~~~~~~~~~~~~~~~
Like I stated in the original reveal, I dreamed this second design. When I do dream a design (at least the ones I remember), it's always just on that brink between sleep and wake. I saw this design clearly in my head as I awoke one morning before I even opened my eyes, but I failed to draw it up/write it down. Later in the day I remembered that I had had one of my dreamed designs and ALMOST remembered what it was. However, I was too busy with something else to focus on it. When I finally got to my craft desk and started sifting through my soup, the design hit me like a MACK truck and I was off and running with it.

It was as simple as cutting a long length of black annealed steel wire (20g), wiping it clean, and sealing it with some Renaissance Wax. Then, I wrapped it several times around my makeshift bracelet form (which incidentally is a baby food jar). I let the wire spring out a bit and made sure there were three circles. I threaded a cinnabar bead onto each end of the wire so that they were parallel to each other with the center wire still in the middle.

Where the ends of the wire overlapped, I left enough room for simple loops and then trimmed the wire. Once the simple loops were formed on each end, they were attached to each other.
To stabilize the back of the bangle, I took the wire that had been trimmed off (about 1 1/2 - 2 inches) and thread it through the simple loops. I wrapped the wire around the bracelet on either side of the loops and secured the ends down with flat-nose pliers.
Right now, I'm calling it "Orbital Bangle"
~~~~~~~~~~~~~~~~~~~~~~~~~~~~~~~~~
For the third piece in my Bead Soup, I had visions of using the Greek ceramic spacers and the pink stones to make a pair of earrings. I planned on making the spacers into dangles just above the stone tubes. Let's just say that it didn't work out. In fact, it was downright AWFUL! So, I was left with a bunch of wire wrapped ceramic spacers. I hadn't wrapped them all yet, just to enough to know how bad those earrings would have been and just enough to know that I didn't want to have to take them all apart. So I stared at those wire wrapped spacers long and hard. I decided to distract myself with something else. Pat and I had been to the beach the previous week. While he played out on his standup paddleboard, I kept myself busy looking for shells. Now, I wasn't looking for the prettiest or most perfect shells. Oh no! I was specifically looking for shells with HOLES ALREADY IN THEM! I know how difficult it can be to drill the perfect hole into a shell without breaking it or overheating the drill. Several years ago I realized that it was just easier to collect the imperfect, hole-y shells instead. Since then, I've collected bunches and bunches of these misfit shells. Wow. . .have I gone off topic or what. Back to the bead soup designing. On the day I needed a distraction, I pulled out my baggie-o-shells from the previous week (it was the easiest to locate) and began attaching jump rings to them. You might even remember
a Bead Table Wednesday post about this process.

It hit me that I could somehow combine both the wire wrapped Greek ceramic spacers and the shells. Since I was using random metals for the jump rings on the shells, I decided to pull out some other wire to wrap the rest of the ceramic spacers. Once I had them all done, I grabbed up the antiqued copper chain from my soup stash and clipped off a portion that would work as a double-wrap bracelet. While Pat and I watched a movie later that day, I set about sorting the shells by size. I spaced out the largest shells first and filled in with the smaller ones. Then using the same mix of jump rings, I attached the ceramic spacers intermittently along the chain.
A simple lobster clasp from my personal stash was added and I had a fun, dangly, beachy bracelet!
~~~~~~~~~~~~~~~~~~~~~~~~~~~~~~~~~
So we're halfway through my soup pieces. You think you can hang on for the rest? Let's see. . .
I absolutely knew I wanted to use the fabulous crochet flowers that my partner had made herself. But how? I puzzled this over and over, I pulled out the flowers and arranged them in front of me, I put them away, I pulled them out again. . .repeat.

I had visions of using them in a long, hippie-like necklace or in a bib statement necklace, but I just couldn't decide how to attach anything to them without harming the delicate edges. I contemplated making separate bracelets out each of them. I even googled images of crochet flower necklaces for ideas. Nothing quite suited my fancy. When I finally realized that I could put shank buttons in the middle rings and then string wire through the button back to make loops, I thought I had finally hit upon the answer. I picked matching silver tone buttons and wired them in place. But once I did that to each of them, I just couldn't settle on a way to make the backs look pretty enough in the event that they flipped over. And, I was finding impossible to figure out a way to keep them from flipping over. As I puzzled over this some more and rearranged the flowers on my desk, I saw them (in my mind) arranged as brooches on a simple cardigan or button up shirt. So, I clipped off the wires and picked out a few other buttons (I wasn't digging the matchy-matchy of the buttons) and set to work with some craft glue and pin backs.

It was a stunning effect. Once they were done, I knew that they could easily be used separately or all at once depending on the outfit.
~~~~~~~~~~~~~~~~~~~~~~~~~~~~~~~~~
At this point, I still had it stuck in my head that I wanted to make a pair of earrings with the pink Rhodonite beads. I tried combining them with some of the other beads in the soup and with other beads in my stash, but absolutely nothing was coming together. In desperation I started digging through my drawers of found objects, old jewelry pieces, and hardware when I stumbled on the brass washers. All at once I knew what I would do.
 |
| I apologize for this heinous picture. |
It was easy enough to pull out the texture hammer once again and bang on the washers. I dipped them in some darkener. . .with very minimal results. (I've having a heck of a time darkening anything brass lately. If you have any tips or products that might work better, please let me know!) Once that was done as well as it could be, I used a helicopter punch to make holes in both the washers. With a brass eye pin, I wire wrapped the stone tubes to antiqued brass ear wires and used a jump ring to attach the washers to the bottom. Easy peasy!!
Remember, I'm GIVING AWAY these earrings. You just need to leave a c
omment on my Bead Soup Reveal post before September 10th to be entered.
~~~~~~~~~~~~~~~~~~~~~~~~~~~~~~~~~
Now. . .I still had that awesome toggle from Karen that I HAD to use. I knew that I could have turned around and slapped it on the shell bracelet or the first necklace, but I really wanted it to have a place of honor. So, I studied it for a while.

In my goals for the year, I vowed that I would try to think out of the box a little more. In this instance, I was struck with the idea to work WITHIN the box and encase something in the large hole of the toggle. My first issue was deciding what would fit in that small of a space. I was aware that it had to be something fairly flat. At first my options seemed to be a paper image/text or a dried flower. I was sorting through my stickers (seemed an easy enough option) when the idea of buttons popped into my head. I'm just a little obsessed with buttons so it appalled me that it wasn't my first instinct. . .and yet here I am admitting this to y'all. Dang. I knew I had a few really small buttons mixed in with my larger ones, so the jar of white buttons was dumped unceremoniously onto the craft room floor. I sorted until I found a few that would fit inside the small hole then narrowed it down to the prettiest of them.
Now it was time to 'encase' that baby button and ICE Resin was the option I'm most familiar with. I'd seen a few tutorials on using packing tape to seal the backside of open-backed bezels and figured that was all I needed to do. I laid the packing tape sticky side up and pressed my toggle onto it. I even turned the tape over to rub it down a little more. Unfortunately, I didn't take into account the bumpiness of the toggle. Oops.

In the photo above you can kinda see how the resin completely coated the back side. I reamed out the top hole and sanded the edges so the oopsie isn't as visible on the front, but I've definitely learned my lesson. Also noticeable in the above image is my solution of what to do with the toggle bar. With darkened copper wire, I made a simple loop to attach the buttoned toggle then threaded the bar onto the wire. I started to wire wrap the bar when it occurred to me (apparently I did not do enough thinking on this project beforehand) that the bar was just going to spin around in circles above that toggle. As I wrapped, it fixed itself as the end of the wire came to rest on the back of the bar. The way it is situated, that bar DOES NOT MOVE. Seriously. . .does not move. Problem solved.

From there, I knew I wanted to add some more mother of pearl buttons. In fact, I thought I was just going to make a long chain of them but there were. . .complications. Apparently I was too tired or something because I was having serious issues figuring out how to attach one button to the next. I kept trying to get them to hook together on the same jump ring. In order to do that, I was having to make some LARGE jump rings. It wasn't working for the more petite feel I was going for in this necklace. So, I decided that I would just attach the buttons to lengths of copper chain leftover from the first necklace with small jump rings. As I worked up the chain, it became painfully obviously that I had had a DUH moment and simply needed to attach the button jump rings to each other via an empty jump ring (I used a link from the chain for my 'empty' jump rings.) Seriously though. . .DUH!

I finished the necklace with with some more chain and puzzled over the clasp for a bit before deciding to just make a hook and loop with button accents. They're not my best and I may re-work them because of that, but I was so very happy to be done with that necklace you have no idea. It was seriously a comedy of errors at that point. But it does look good!
If you've made it this far, you are a real trooper! I appreciate you taking the time to read through it all. I just wanted to explain everything out for those who were wondering. Thanks for sticking with me and I hope to have something a little lighter for the next post.


